Coleco Game Repair (Pac Man, Ms. Pac Man, Donkey Kong, Frogger & Galaxian)
Page 3- Time to fix electrical problems. Here I'm going to cover three problems:
1- No power to the game at all
2- No image on display (but sound works)
3- And my problem specifically: Part of the display is not working.
A lot of this applies specifically to VFD games in general, as they are all
very similar in their design.
Nothing's more annoying than a game that just won't work. If your game won't power on at all (turn it on, and attempt to start the game, and hold it to your ear to make sure there's no sound at all), there's a couple of things to try: Naturally, I'm assuming you know you have good batteries :) . The Coleco games don't have power adapter ports exactly, but Coleco did make the Perma Power adapter that uses 4 fake batteries plugged into the wall. Either way, make sure you have power, and it's getting to the game. The best way to guarantee this is to get a volt-meter (learn how to use it), and test the connections. With the game off, and batteries in, test voltage where the wires connect to the main board. Test for voltage flowing through the power switch when turned on. Usually, no power at all means one of three things: 1- Power is not getting to the main board (bad wires or dirty battery
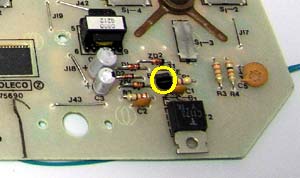
contacts) One other thing to carefully test for is heat. Frequently, when you have a bad transistor, it will get really hot, really fast (and I mean within seconds it can burn you, so be careful). You can usually smell them getting hot. If you are adventurous, turn on the game, and quickly tap the transistors (in the photo below) with backside of your hand or fingers (don't use your palm-side of your hand, the skin is too thick and you may already have a burn by the time you realize it's hot). Use the same logic (if you want to call it that) that you would use if you were going to touch an iron or stove to see if it's getting hot, don't just plant your hand on it and see if it hurts... Now, if one is getting hot, turn the game off, and test or replace ALL of them. Sometimes a bad one can cause a different one to overheat (and it will eventually die too). Don't just replace the hot one, as it may not be the source of the problem. |
| If power is getting to the main board, and seems to be getting through the power switch, but doesn't go much further, I'd suspect a transistor. For me, this is a quick test, but if you aren't familiar with de-soldering or testing transistors, then this might not be for you. Basically, there are two transistors in the game (one circled in yellow, the other is the black square right below it), remove them both and test them with a meter. (Other games might have more, just learn their apperance, they are black, almost always circular with one flat face, and have 3 connections coming out of them.) If either fails, replace it. (They are cheap, you can always just replace them instead of testing them if you'd rather go that route.) I'm still surprised how many games I've fixed with this one procedure. It just takes plugging in the wrong kind of power once... These almost act like fuses for the game. |
|
| If none of the above seems to fix the game, and things aren't getting hot when turned on, try testing several points on the game with the volt meter and see if you can trace how far power is going. Also, check the traces on the main board as best you can for damage, corrosion or breaks (see the section below about my problem for an example of this). If you are determined to fix your game, remove all the transistors, resistors, diodes and capacitors, and test them all. If everything is working, and you can't find physical damage to the board, most likely the CPU chip itself got damaged. That usually means find another game... (Also, if you find a bad component, test them ALL before you replace the one and power up the game. Another component could be causing the damage to the one you just replaced.) |
Getting sound is a partial good thing, that proves right away that the
game works. It could be bad, because that means the display itself could
be damaged (but not necessarily). First- after opening the game, look for
any loose parts, especially little pieces of glass. Finding some would be
a bad thing since the display is made out of glass, and is built similar
to a light-bulb: It has filaments in it, is made of sealed glass, and the
air is pumped out to create a vacuum. Any hole in the display itself will
destroy it permanently. Inspect the corners, underneath if you can see,
and most importantly the weakest spot of any VFD display: The exhaust tip.
This is the area where the air was pumped out of the display during manufacture,
and looks like a tiny baby bottle nipple (see image below). This is the
thinnest piece of glass on the display, and it pokes out just asking to
be snapped off. A lot of times, manufacturers will actually protect this
area of the display in a small plastic or rubber housing.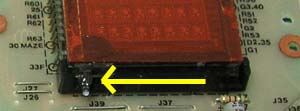 1- The display isn't getting power 2- There's a bad contact between the display and the motherboard 3- The display is burned out. (Like light bulbs, VFDs have a finite life span, which is rarely reached, but certain things can speed that up. Usually a burned out display is from too much voltage reaching it somehow. They usually don't just go out like a light bulb though, they will slowly get dimmer and dimmer over time. Do NOT be concerned about a half-inch (or so) diameter black or silvery 'burn mark' inside the display, this is normal (just above the yellow arrow in the picture above).) If it's a power problem, your culprits are going to be either the transistors (mentioned above), or the power transformer for the VFD (highlighted yellow in the pictures below). The VFD requires high-voltage power (this is the part that can cause mild shocks. You can feel them, but they won't really hurt you if you let go. Be ready for them though, you don't want to be surprised and drop your game). This power comes from the transformer (which may also be a black ceramic-type disc in some games, see the alternate version of the circuit board on page 2 for an example), and if it's burned itself out somehow, it will probably be tough to find a replacement (other than taking one from another game). Listen to the transformer closely with the game on, these usually make a faint, high-pitched whine if they are working at all. (But, not always... unfortunately, I'm not really certain how to actually test one without knowing the pinouts of the thing. I've also never found a bad one, so unless the game was really abused, it's probably okay.) 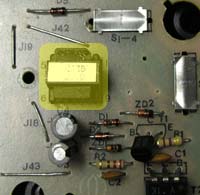 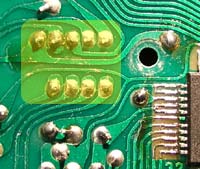 |
| This kind of problem is almost always a bad solder joint between either the display and the main board, or the CPU chip itself and the main board. The other two causes would be a bad trace somewhere along the main board, or an actual partial failure of the display itself. Quick-test for a cold solder joint by following the instructions in the paragraph immediately above. If your partial failure corrects itself, even for an instant, redo all the solder joints as mentioned above. With luck, problem solved. |
Some VFD display tech: two types of physical damage I've seen are broken displays (the glass actually broken), and broken filaments. If you look really close at the score in the picture to the right, you will see 8 really thin, vertical wires (filaments). These go all the way to the bottom of the display, and when charged, they emit electrons that will illuminate the phosphor of the graphic images (if allowed, this is controlled by the screens, see below). If one breaks (not sure how, maybe by dropping the game), the entire vertical area of the display it covered will be slightly dimmer than the rest. The more that are broken, the less the display will function. Every sprite has a screen over it (and in many cases, several sprites are under the same screen). Again, looking at the score, the first 88 (and the graphics that appear in the row beneath it) is under one screen, the following 880 is under another. On the playfield, each row of graphics across is covered by one screen (9 total). If any one of these is not getting power, that whole row won't function (hey, sounds like my problem!). (When the screen is electrically charged, it will allow the electrons from the filaments to reach the phosphor graphics below it.) Each screen can be easily traced right out of the VFD to the main board (yellow lines). Each individual sprite can also be traced out, but this usually requires you to see the bottom of the VFD as well as the top. The sprites are usually grouped together as well, so if there's 100 sprites on the game, there may only be 15-20 contacts coming out. |
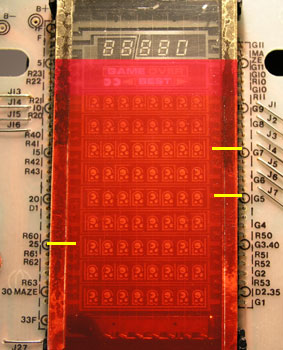 |
For the curious, here's what the back of the VFD display
looks like. Every single sprite (or graphic image) on the front of the display is touched by one of the white lines on the back of the display. If you look closely, you will see little 'marks' along the longer, straight lines. These dots are the contact points with the sprite image directly on the other side of the display. The squares along the top and bottom represent the contact points for each of the metal contacts coming out of the display. This display was made by Futaba, a company that is currently the leading manufacturer of VFD displays today. If you really want to get into the details of how these work, check out This Page, and also check out the Interactive Diagram at the very bottom of that page. 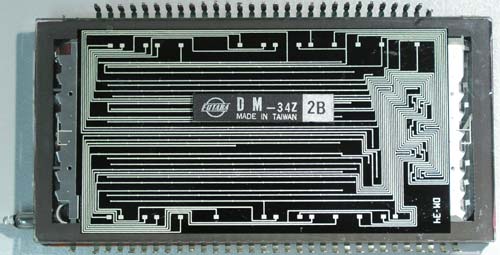 |
| Remember my problem? My entire forth-row up from the bottom isn't working, so I immediately suspect the screen covering that row. Highlighted here, we can follow the metal contact out to G4 on the board (it also comes out the left side, but after examining the board, you would notice it doesn't connect to anything). In my case, applying pressure to the VFD and the main board didn't affect the display. This doesn't dis-prove the cold solder joint theory, but I'm going to look really close at the main board before I just start re-soldering things at random (but I'll get to that if I have to. :) ) | 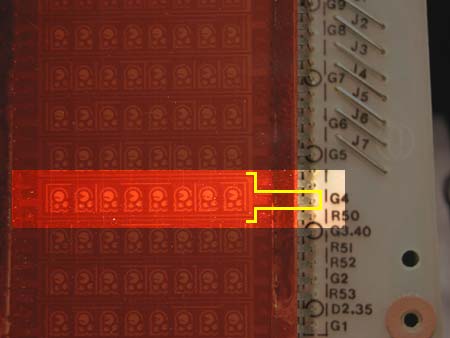 |
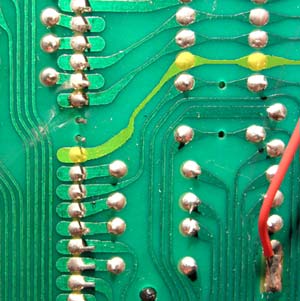 |
So, to start off, we flip the board over paying attention to where G4 is located on the front side, and we end up with the yellow highlighted trace seen here. (A flashlight can help here, you can shine light through the board making each side visible from the opposite side.) |
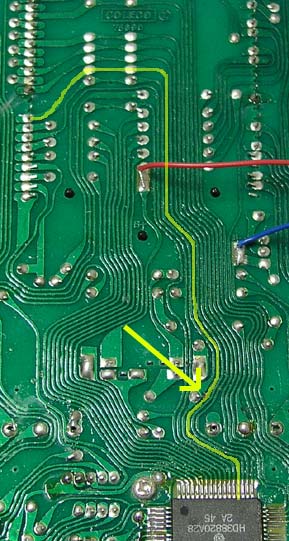 |
Looking at more of the board it self, you can see the entire circuit trace
all the way down to the CPU chip itself. The problem HAS to be along this
path if it's not actually a problem with either the VFD or CPU themselves.
Examining the trace closely, I noticed this imperfection right where the
yellow arrow is pointing to: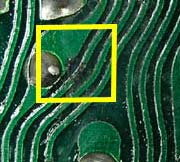
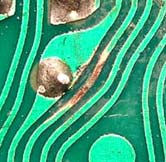 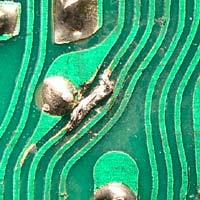 |
| It isn't pretty, but it did the job. As you can see on the right, the game now works perfectly! | 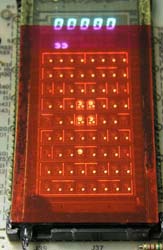 |
Not being 100% certain what caused the corrosion on the main board in the first place, I decided to inspect it for other discolorations (any trace not really nice and green could be suspect). I found these. Being pro-active, it's a good idea to clean them and solder over them to avoid problems in the future. | 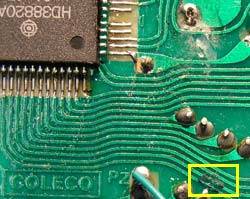 |
On to the final step: re-assembly! NEXT
PAGE
Or back to the PREVIOUS
PAGE